A slight obsession with books

Crafts, cats and books


6 Comments

Frodo’s cushion

This was probably the easiest cushion that I’ve made yet. I’ve made it specially to fit inside the cat carrier as Frodo will be travelling home all the way from Cannock and it’s a long journey for a little cat. I felt he needed something soft and squishy to cuddle up on for the journey.

I didn’t have much time to get this done so I went for the quick and easy method and did quilt-as-you-go. I used scraps too, so I’m feeling quite virtuous. I cut the batting and some muslin just a bit bigger than I’d need for the inside of the carrier. Then I picked out a couple of small scraps and stitched them to the centre, and added the rest of the fabric going round and round so it’s a bit like a log cabin effect. Once all the batting was covered, I cut a couple of pieces of fabric for the envelope-style back, hemmed the edges and sewed it all together.

carriercushion-02

I had to make a cushion inner as it’s an odd size but that didn’t take long. I just sewed two pieces of fabric together, leaving a gap to pull through. Then I topstitched the opening closed after filling it with washable stuffing.

It fits beautifully and I didn’t stuff it too tightly so it’s quite soft.

carriercushion-01

I’m rather pleased with it. Hope Frodo likes it 🙂


2 Comments

Pinwheel Cushion

I’ve had this on my desk since March. I made a decent start on it by cutting out gazillions of squares and making my HSTs. After that, I didn’t seem to get any time to play with it so it’s been sitting there looking reproachfully at me.

Yesterday though, I decided that it had to be finished so that I could start a new project that I’ve been  planning. You notice how I found time to plan new things to make, but not time to finish the ones that I’d already started.

I managed to get the front and back pieces finished yesterday and today I’ve quilted the front and assembled it all. I did consider trying some fancy quilting but went for stitch in the ditch in the end. Keep it simple and I’ve less chance of making a complete dog’s dinner of it, eh?

PinwheelCushion05

Pinwheels! This may have been a bit ambitious but I thought the practise at doing the HSTs would be useful. They’re mostly wonky but I was improving as I went along so there is that.

The pattern I was following gave instructions for the front and then said to  do the back how you wanted. I chose to do an envelope style instead of using a zip, ’cause it’s easier. Also, I wanted to try to  make the back a bit less plain so worked out how to do a bit of a border to the top piece. I’m quite happy with how that turned out.

PinwheelCushion06

I’m thinking that maybe I should have ironed it before taking the photos, but you know how it is. You get so excited to have finished something that you just can’t wait to get the camera out. Please say that isn’t just me.

This is the cushion once the pad was inserted.

PinwheelCushion07

And in situ with the one that I made using the same fabrics.

PinwheelCushion08

Not the sharpest photo, but as I’ve said before, there is no natural light in my living room. If I ever move house again, I shall be buying somewhere that’s better for taking photos of my creations 😛

I’m going to tackle a quilt next. I have all the materials needed to make a fairly large lap quilt. The pattern is very simple so hopefully won’t take long. I may make a smaller one first though, just for a trial run. I have the fabric for a smaller one, but need to find a design for it.


21 Comments

Starry Skies cushion

Before I get onto the ‘Hey look what I made’ moment, I’d like to ask if it’s just me that can’t seem to find a speed between stop and 90 mph on my sewing machine. It doesn’t matter what angle I place my foot at on the pedal. Or what height I have my chair. Or how gently I ease my foot down. It hums gently as my foot increases the pressure…

…and it’s off like the clappers. 90 mph, every time. Oh, I can get it to slow down occasionally, to a very slow pace that gradually eases to a stop. Then as soon as I try to get it going again it whizzes off as if I’ve floored it.

Is there some special technique? Some knack that you learn at sewing machine school and isn’t available to us ‘learn as we go along’ folk?

Just be aware that some of the seams you’re about to see aren’t quite straight and I’m blaming that on trying to keep up with that blasted machine.

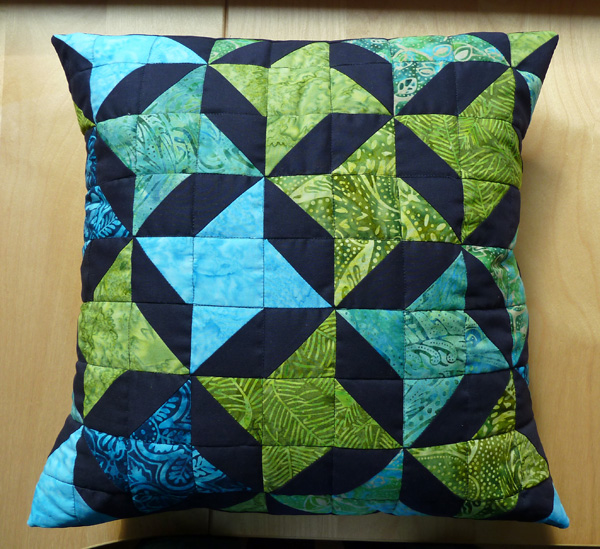
So, my latest creation. I mentioned recently that I was having fun with Foundation Piecing. This is the result. Look what I made!

StarrySkies06

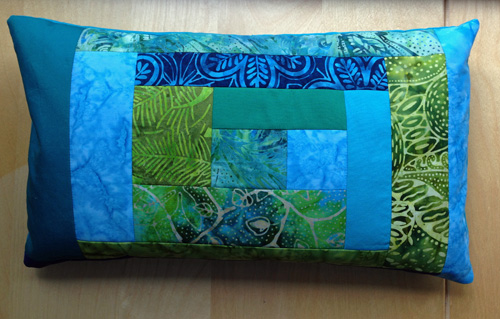
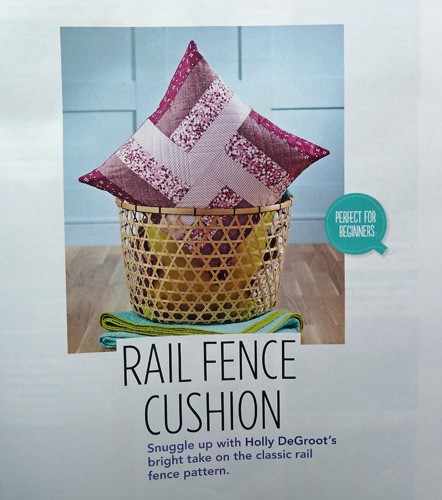
It’s the cushion from issue two of Love Patchwork and Quilting and the designer is Holly deGroot. She also designed the other cushion that I made so I guess I must like her style. Once again the instructions in the magazine were brilliant and I found the Foundation piecing really easy. I loved how precise it was and can’t wait to have another go at it.

StarrySkies02

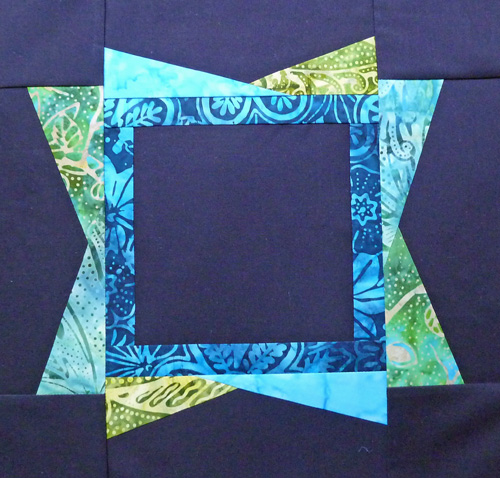
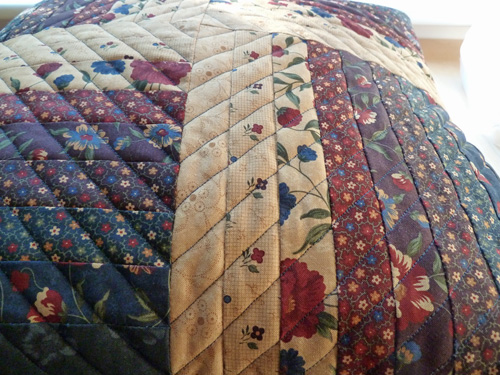
And with the piecing finished

StarrySkies03

The magazine example was in completely different colours.

magpicStarrySkies

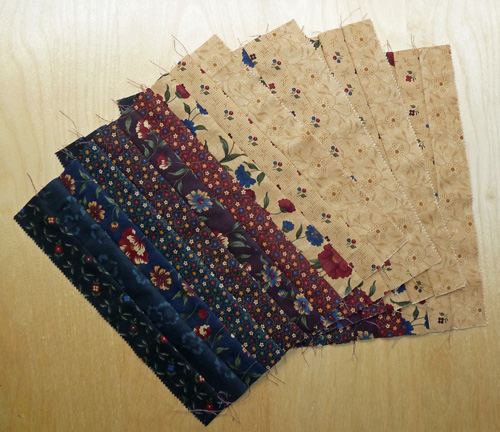
I had that lovely Batik fabric and thought it’d look great with a dark navy background and I’m very happy with how that turned out. The colours really pop against the navy.

I do know that I should have paid more attention to how the navy fabric was lying but I didn’t realise it all had to run the same way until I noticed that some pieces looked different shades and looked it up online. I’ll know next time. So much to learn!

I decided to Stitch in the Ditch for the quilting and not attempt the squiggly quilting in the example. I think that must be free-motion and I’m not even sure if my machine can do that, let alone me.

StarrySkies05

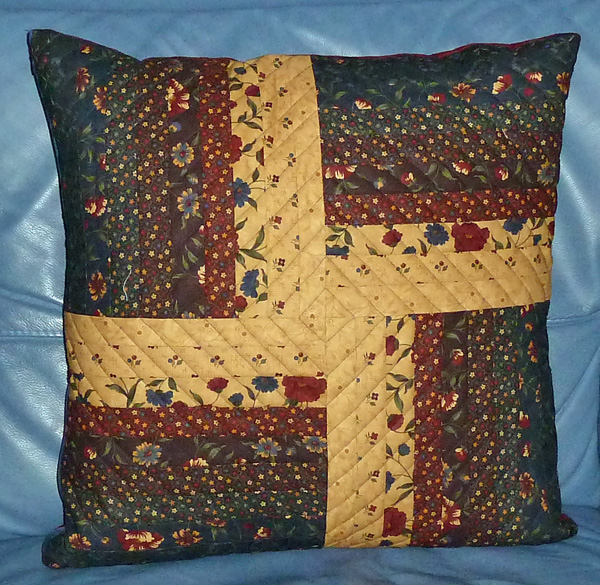
I used fabric from the same range for the back.

StarrySkies07

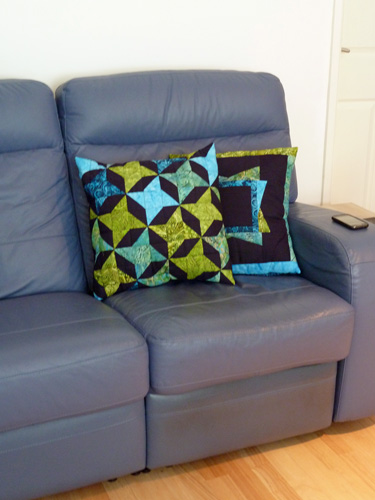
And now it’s sitting on the sofa.

StarrySkies08

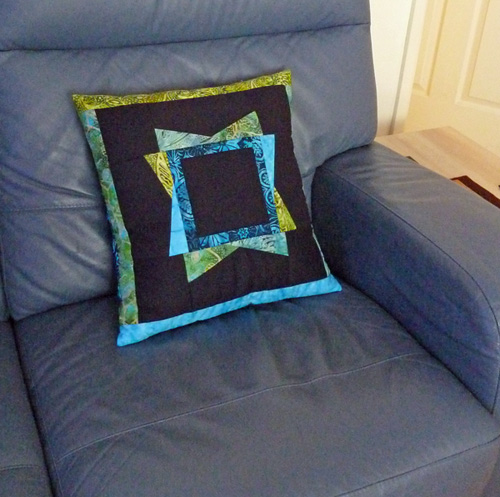
That’s a terrible photo as the light in our living room is bad at the best of times, but in the winter it’s non-existent. Maybe I should have put the light on. Something else to remember for next time 🙂

The quilting went a bit wonky in places and not all the seams are dead straight apart from the pieced ones, but other than that, I’m chuffed to bits with it. I love that fabric and I loved learning the piecing technique. This is so much fun. I can’t think why I didn’t try all this years ago.


4 Comments

Having fun!

I’m making another cushion and I’m having a huge amount of fun doing it. I’ve discovered the glorious world of Foundation Piecing.

I’m loving it. It’s another one from the new magazine, Love Patchwork and Quilting and the instructions are excellent. The templates are on the website so I downloaded them and printed them onto freezer paper. It’s so easy to get perfect seams and corners and to get it all lined up. Love it!

StarrySkies01

The front of the cushion is almost done but I need to cut some 18″ strips for it. My one and only quilting ruler is a 12″ square and my cutting mat, which I assumed was self-healing but apparently isn’t, is just an inch or so larger. I decided that with one cushion already under my belt, and a growing fabric stash, a larger, and definitely self-healing mat was needed, along with a longer ruler.

They’re both on their way so I should be able to finish my cushion off next weekend and then I’ll have another one to show you. And yes, I know I ‘could’ cut the fabric with my small mat and ruler but it’ll be so much easier and more accurate with the larger ones.

I’ve already got the next cushion planned, and even have the fabric pulled for it. There was a booklet of different blocks with the latest copy of the magazine and I want to try making most of them. There’s a nice star that’ll look lovely on a cushion front although I think we may get overrun by cushions at this rate 🙂


17 Comments

Rail Fence cushion

I’ve had great fun making this cushion. It’s one of the projects featured in the first issue of the new quilting magazine – Love patchwork and quilting. It’s supposed to be good for beginners so perfect for me to have a go at. This is the mag picture that caught my attention.

magpicRailFence

Pretty, isn’t it. It calls for wide strips but I thought it’d be a good way to use up some more of the never-ending honey bun that I used for the monthly cottages. I adapted it to narrow strips in a variety of colours instead of shading from light to dark in one colour. The honey bun is Kansas Troubles, Sandhill Plums. I love those colours!

First I made my four squares. I tried to make them go from light to dark although it was difficult to decide which was lighter in some cases. I think it looks about right though. These are the four squares before being tidied up.

railfence01

After joining the squares together and pinning the cushion top to the batting and muslin, I then needed to decide what I was going to do about quilting it. On my earlier attempt at quilting, when I was just trying it out, I did stitch in the ditch, but this time I wanted to do something more adventurous. The magazine example is done ‘on point’ and looks gorgeous. I thought I’d do mine like that but instead of doing different widths, I’d do it so it matched the strips.

Like this.

railfencedetail

I’ll be honest, I did think I’d been just a little bit too ambitious but I had a picture in my head of how it would look and I really wanted to try it. It took me longer than I thought it would, but once it was finished I was very happy with it. It actually came out just how I’d planned. As the fabric is in several different colours, I decided to go with navy cotton. Whichever colour I picked was going to show somewhere so I planned for it to make a statement in the centre. I’m not sure if that’s the accepted way of doing things, but I like it 🙂

Once the top was quilted I had a mild panic attack when it came to the zip. I’ve done a couple before but the instructions for this were different to how I’d done the others and I really wanted to get it right. I had my own personal cheerleader though, (thanks Jackie!) and managed it with it only going slightly wonky.

railfencezip

The back is in a red fabric that matches the strips in the Honey Bun. The only other yardage I had to match was in a brown or a green and I didn’t want to use either of those. I think the red looks fine though.

railfenceback

Once the zip was in, all that was left to do was sew up the three sides and insert the cushion pad. I got several at Ikea last time we were there so it looks like I’m going to be making a few more cushions yet.

The finished cushion is now on my sofa and I’m leaning on it now. It’s very comfy. I’m chuffed to bits with how it turned out and I really enjoyed making it.

railfencefinished

Stephen is very impressed. He wants me to make a quilt for the bed now with matching pillow cases. I think I may make a few more cushions first though. Just to get a bit more practise.

One last close up of the finished cushion.

RailFenceCushion


11 Comments

Crocodile stitch cushion

It’s finally finished. The Crocodile stitch granny square has now been made into a cushion, as planned.

CrocCushionF01

I’m really happy with how it turned out. The Crocodile stitch sits beautifully with the cushion pad inside it. I even made the cushion that goes inside it.

I had a plain cushion inner from Ikea but as it’s white and not particularly pretty, I didn’t want to use it on its own. I bought some pink fabric and a zip to make a cushion cover for the inner which I could then slip inside the crochet cover.

CrocCushionFinner
I don’t have much experience of putting in zips but the instructions that came with my sewing machine are quite good. Basic but good, so I managed ok with those. It’s not too bad as long as you don’t look at the back. Also, I must remember that if sewing a hem, it’s a good idea to use the right colour cotton in the bobbin…

CrocCushionFzip

I’d closed three sides of the crochet cover with single crochet and planned originally to stitch the fourth side to the edges of the zipped side of the inner, but in the end, I thought it would look nicer if I closed it with single crochet. If I want to open it to clean it, it’ll be easy enough to unpick that and then crochet it closed afterwards.

CrocCushionF02

I just need to decide where it’s going to live now.